

Cloudflare’s free plan does something most people misunderstand: it caches your images, CSS and JavaScript at the edge — but not your pages. The HTML itself is generated by WordPress on your server for every single visit, travels the whole distance to the visitor, and your time-to-first-byte is exactly what it was before Cloudflare. Cloudflare’s own answer to this is APO (Automatic Platform Optimization), which caches full pages at the edge — but on the free plan it is a paid add-on. The thing is, you can get the same effect on the free plan with an API token and a caching plugin that knows how to keep the edge cache honest. In this guide we set it up with Swift Performance, from token to verified cache hit, in about ten minutes.
Why your HTML is not cached (and why that is the default)
Caching a page for anonymous visitors is easy. Caching it safely is the hard part, and it is why Cloudflare does not do it by default. Two things go wrong the moment you naively cache HTML at the edge:
- Dynamic pages get frozen. A cart, a checkout, a logged-in dashboard — serve those from an edge cache and one visitor sees another visitor’s session. Any full-page setup must reliably exclude them.
- Stale content sticks. When you update a post, Cloudflare has no idea. Without automatic purging, your edit shows up whenever the edge cache happens to expire — which might be days later.
So the real job is not “turn on caching”. It is: cache aggressively, exclude the dynamic pages, and purge the edge automatically the moment content changes. That last part is what the Cloudflare API token is for — it lets the plugin on your server talk to Cloudflare and clear exactly what changed, which in turn is what makes a very long edge cache lifetime safe.
Step 1 — Create a Cloudflare API token
Log in to your Cloudflare account, open My Profile (top-right menu), choose API Tokens in the left menu, and click Create Token.
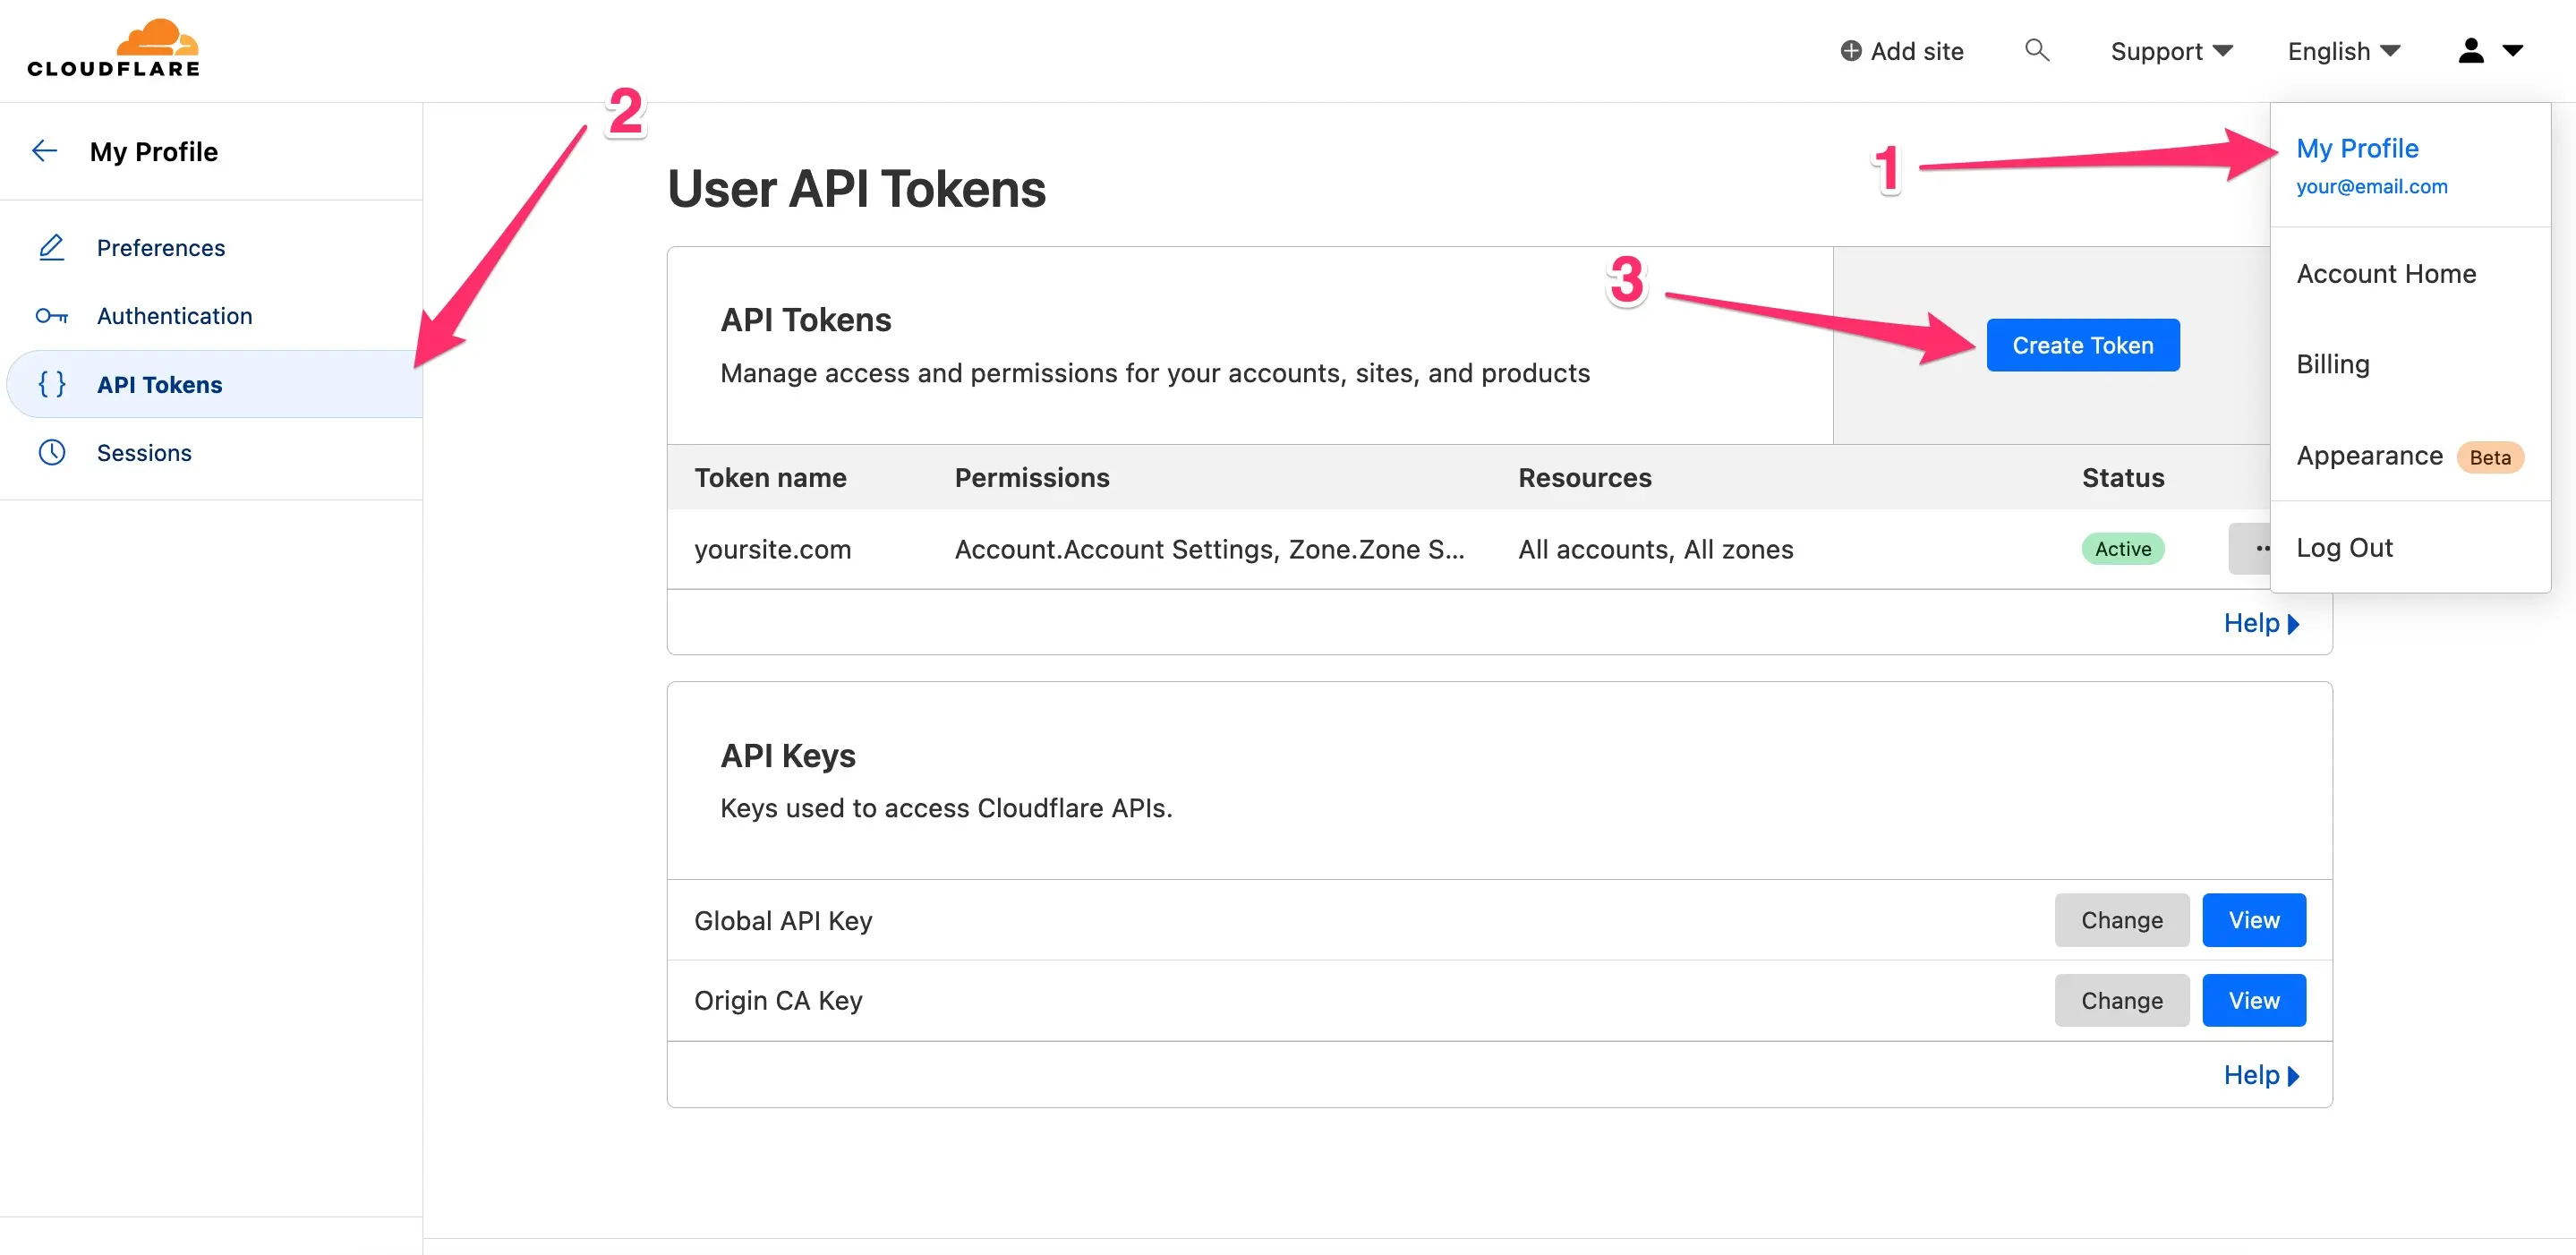
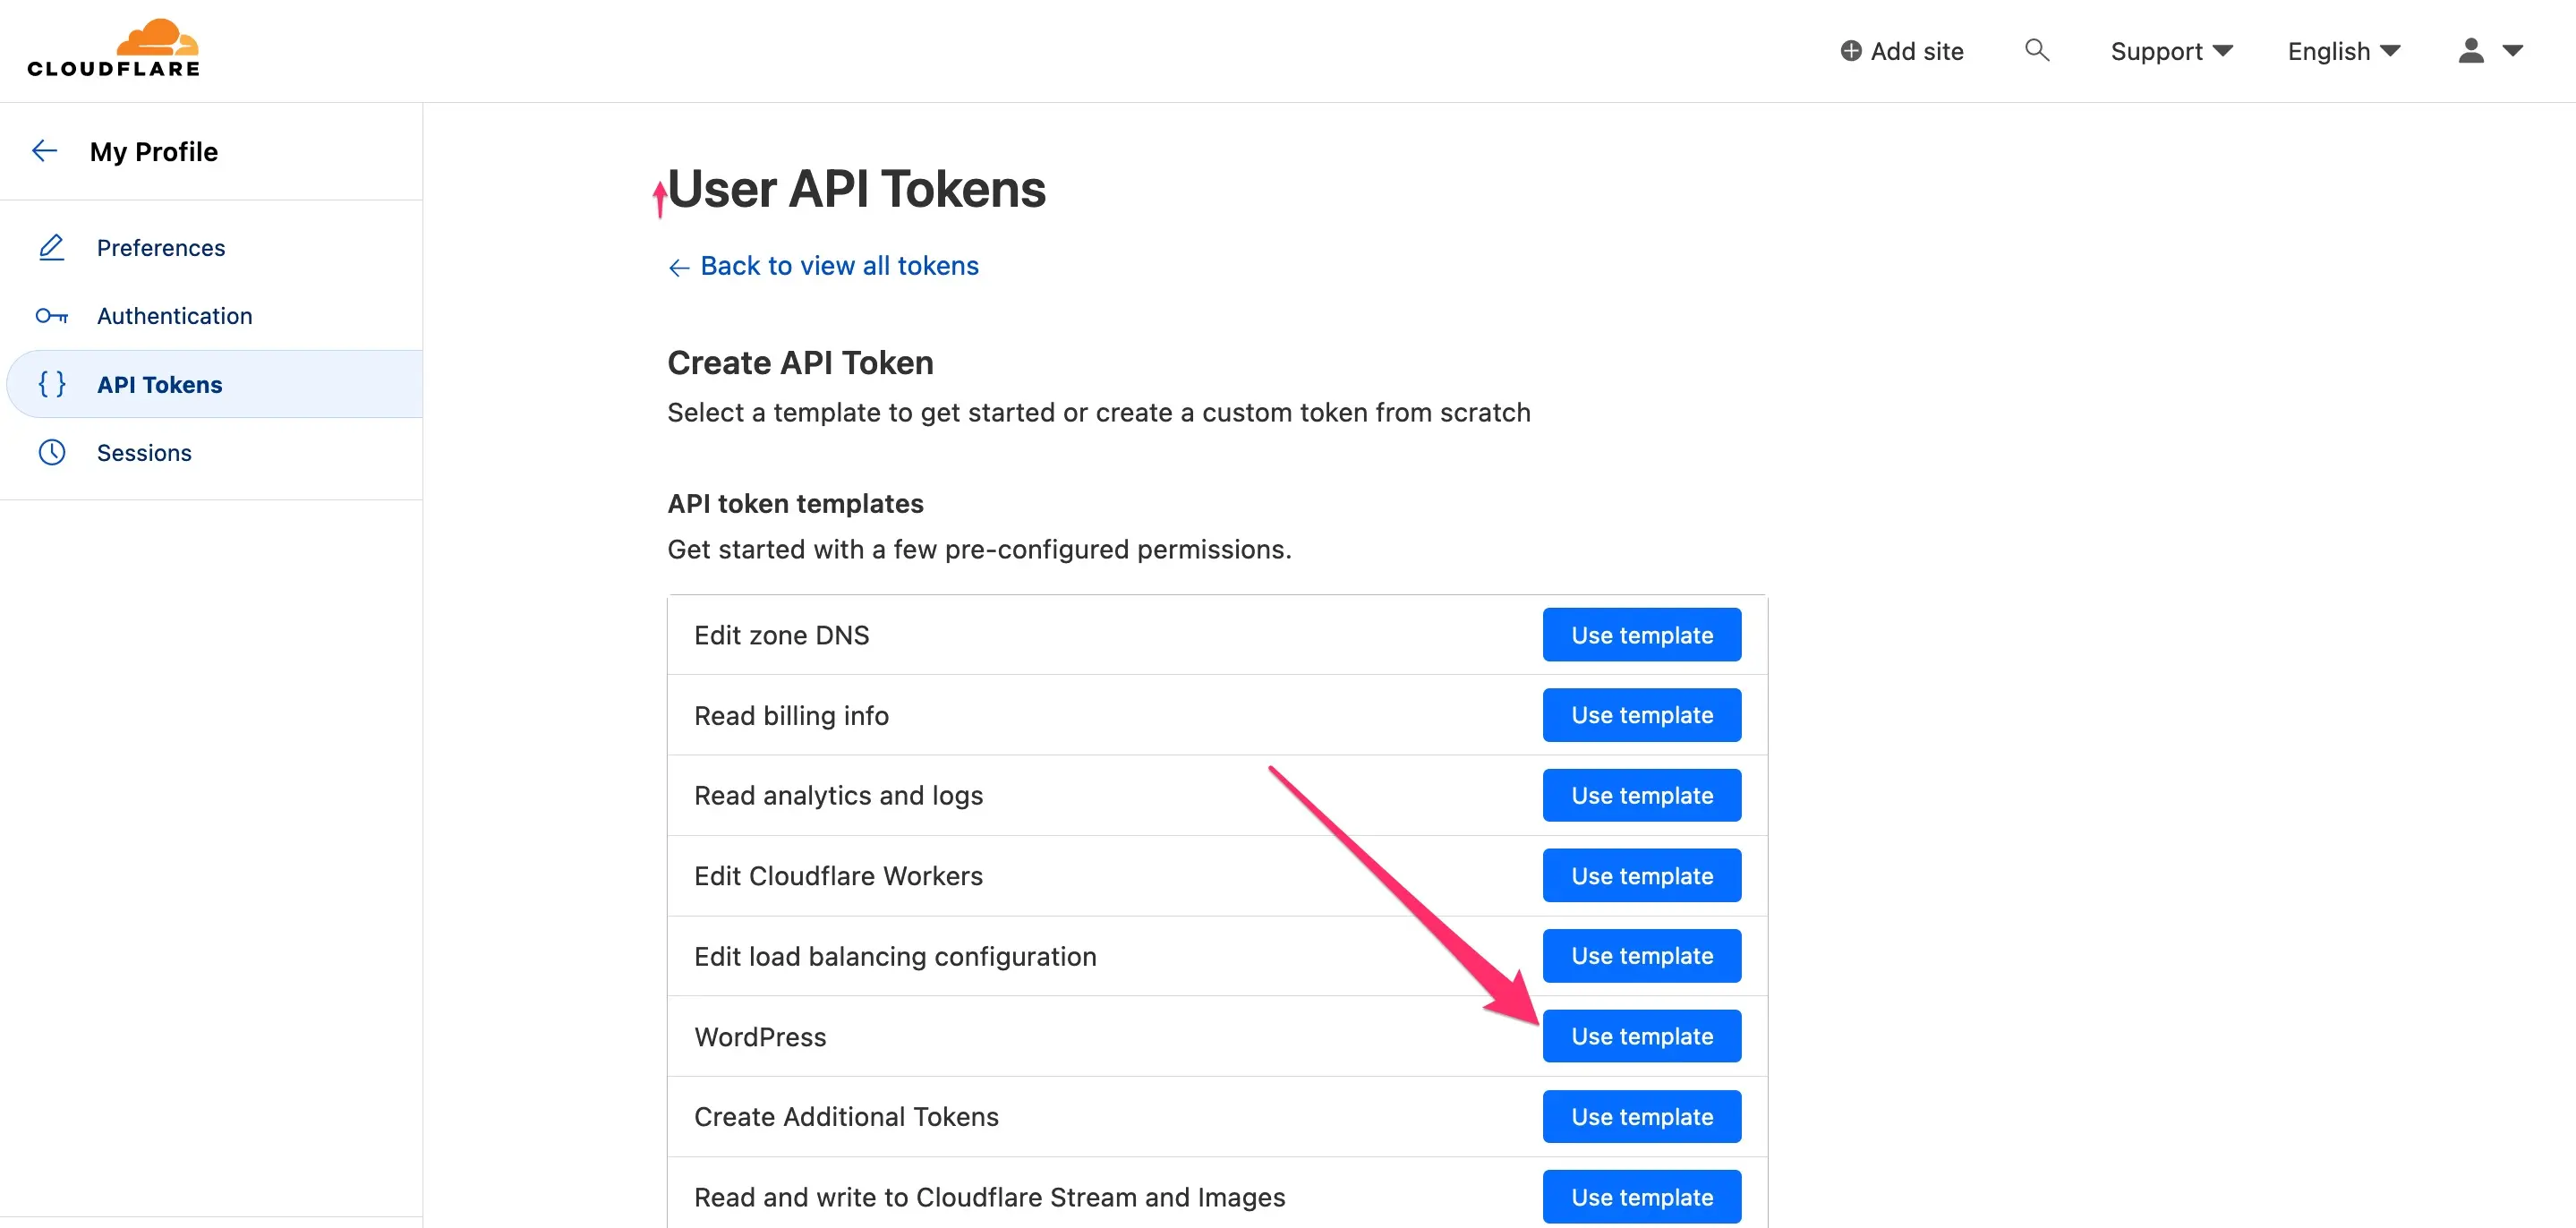
Cloudflare ships a ready-made WordPress token template — use it. It bundles the sensible permissions a WordPress integration needs, so you are not building a token from scratch.
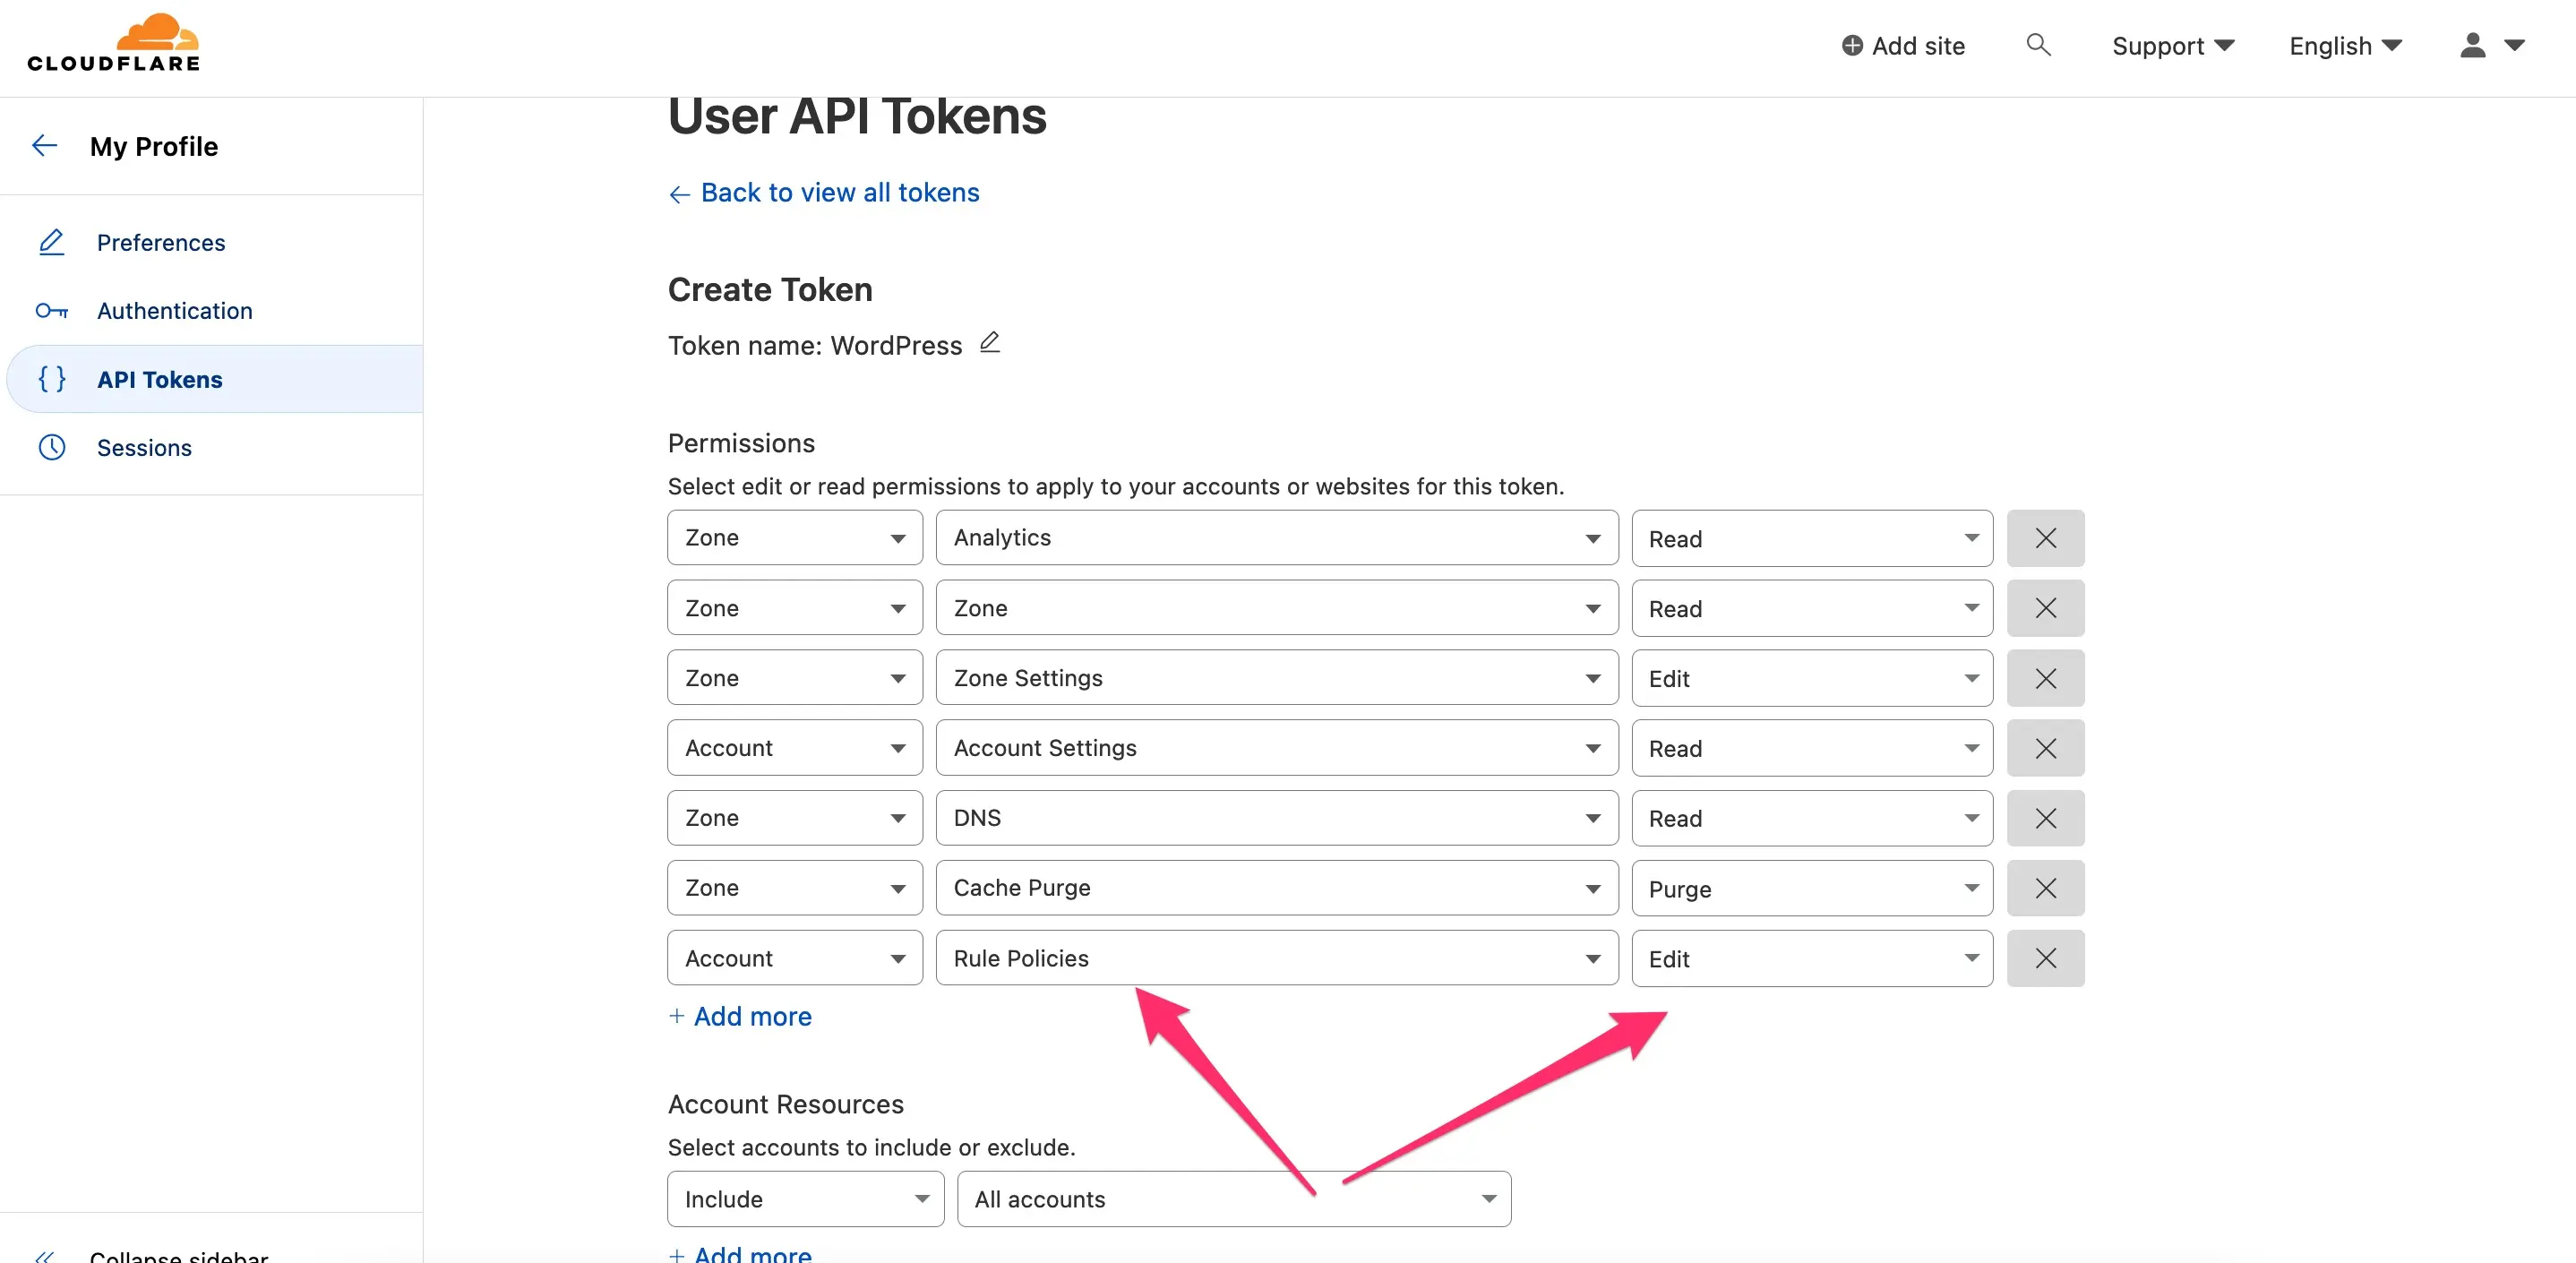
One addition is needed on the permissions screen: the WordPress template can purge the cache, but it cannot manage the caching rules themselves. Add one more permission row with Edit privilege for rules, as shown below — this is what lets Swift Performance create the cache-everything and bypass rules for you instead of you clicking them together by hand.
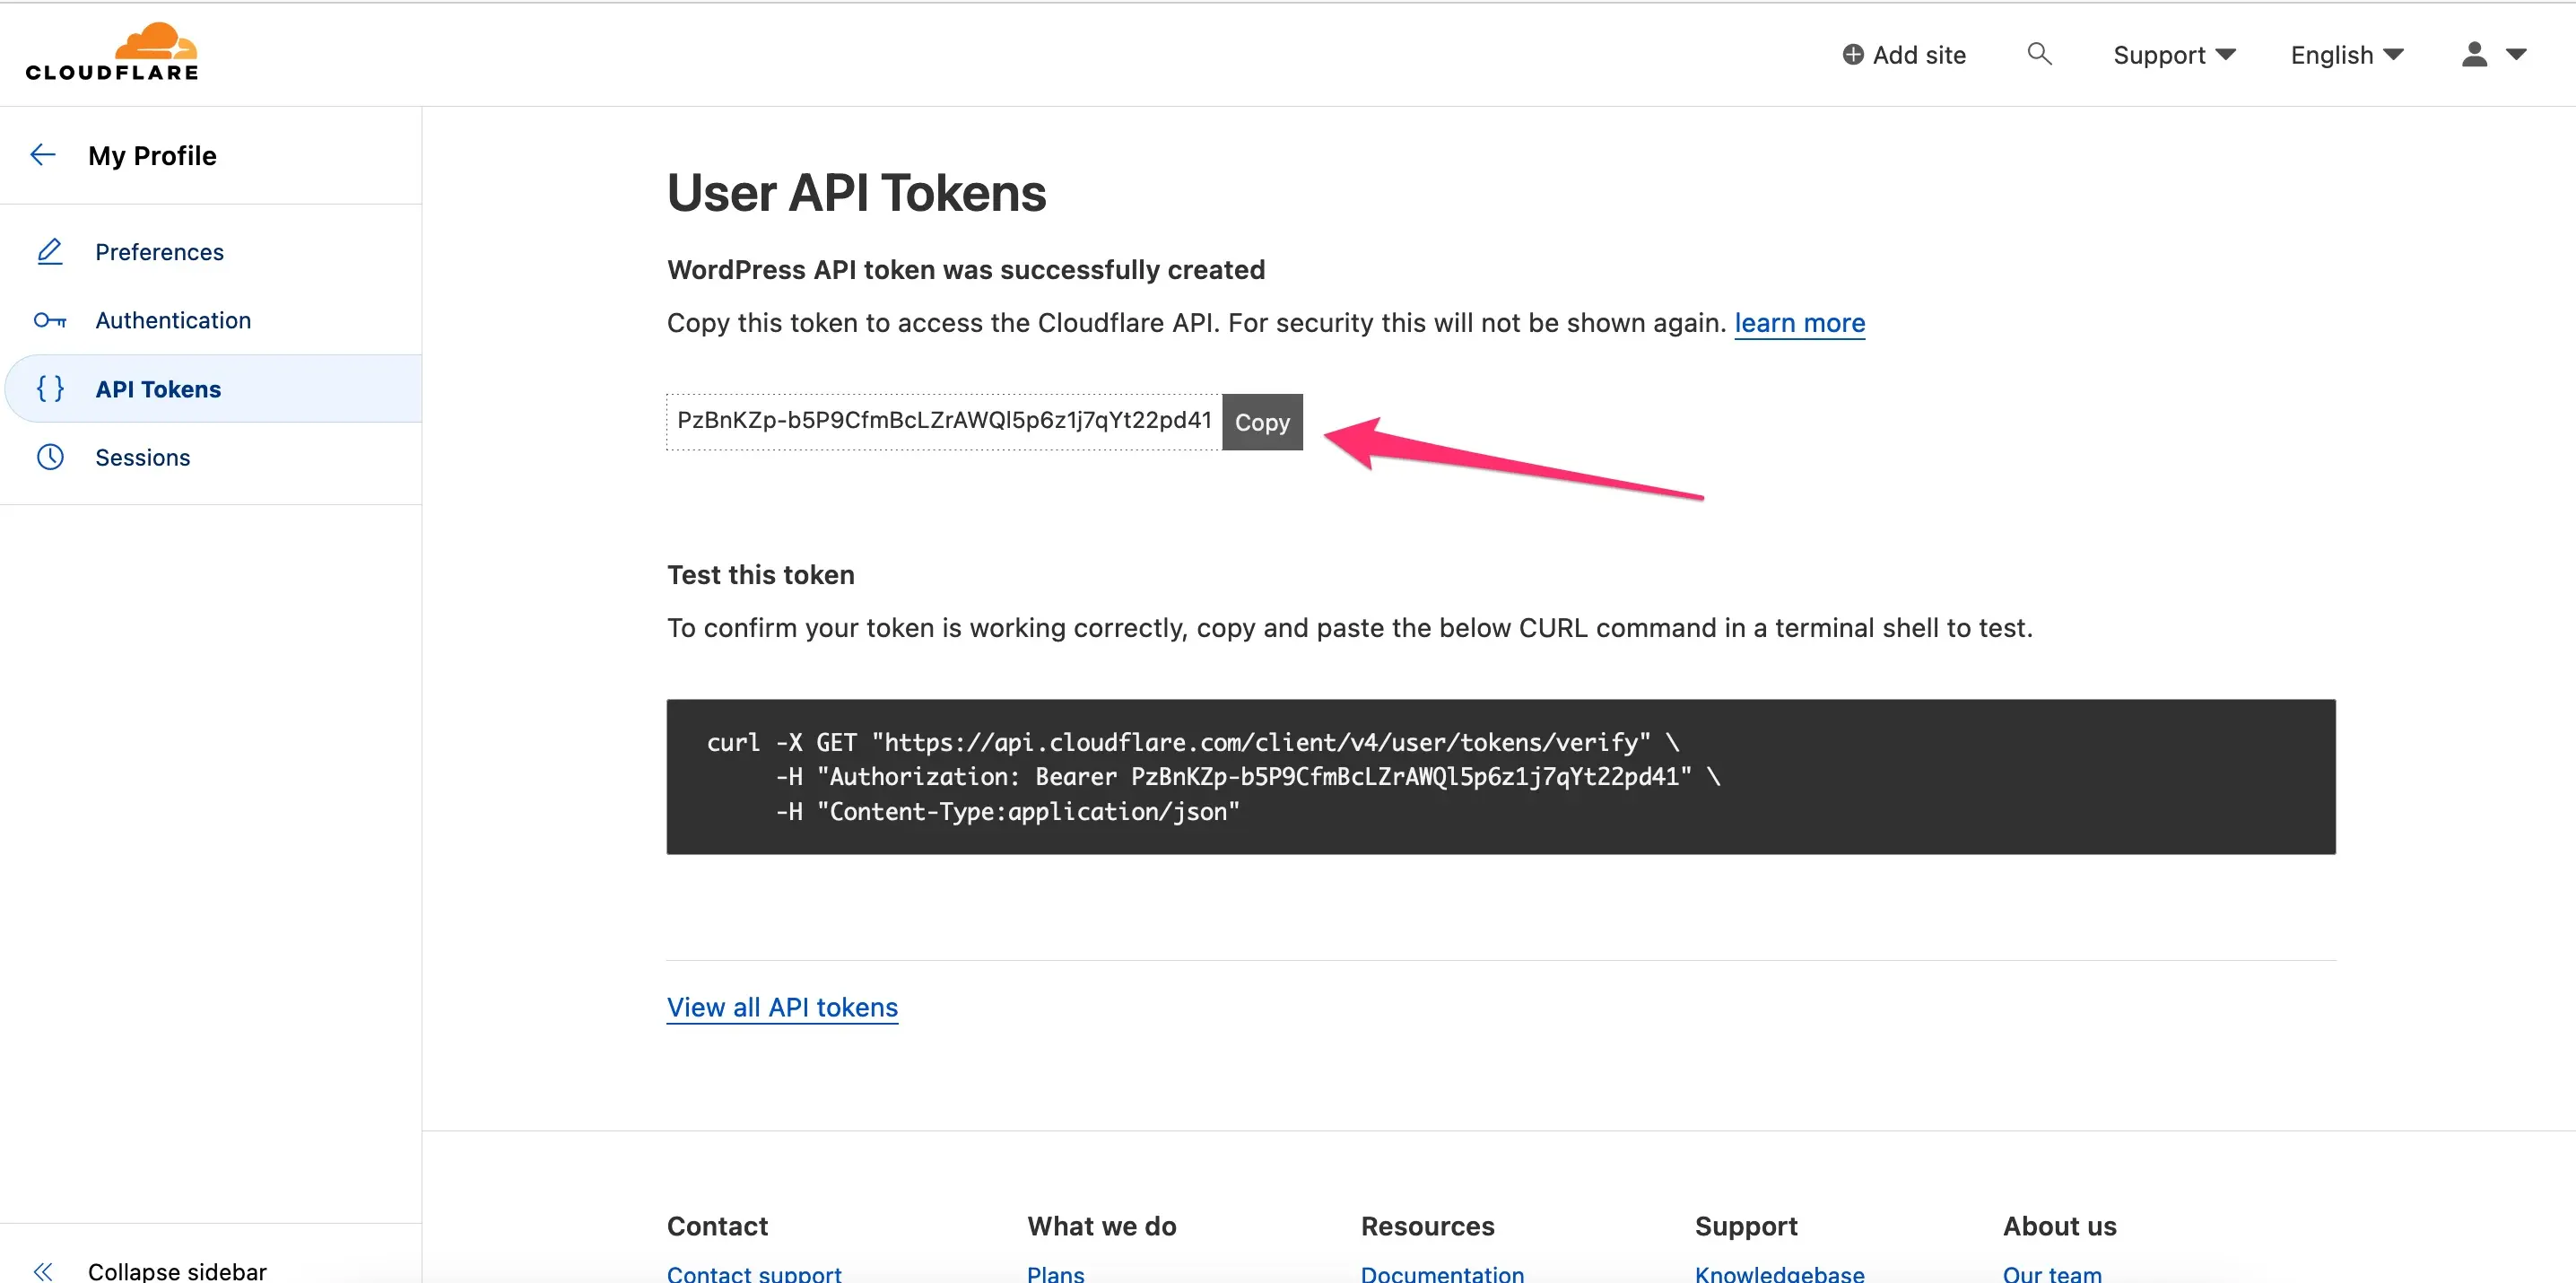
Under Zone Resources you can scope the token to the one site it is for — good practice, though “All zones” also works. Click Continue to summary, then Create Token, and copy the generated value. Cloudflare shows it exactly once; if you lose it, you create a new one, so paste it straight into the plugin in the next step.
Step 2 — Connect Swift Performance to Cloudflare
In Swift Performance, open the Cloudflare tab under Integrations and flip on Enable Cloudflare Module. This is the auto-purge connection: from now on, whenever Swift Performance clears or rebuilds a page’s cache — you edited a post, a comment was approved, a product’s stock changed — it purges the same page from Cloudflare as well.
Set Authentication mode to Token and paste the token you just copied. (The e-mail + API key mode exists for legacy setups; the token is the one to use — it is scoped to what the integration actually needs, and you can revoke it without touching anything else in your account.) A detail worth knowing: if a previous Cloudflare plugin already stored working credentials on the site, Swift Performance picks them up automatically and you can skip the token dance entirely.
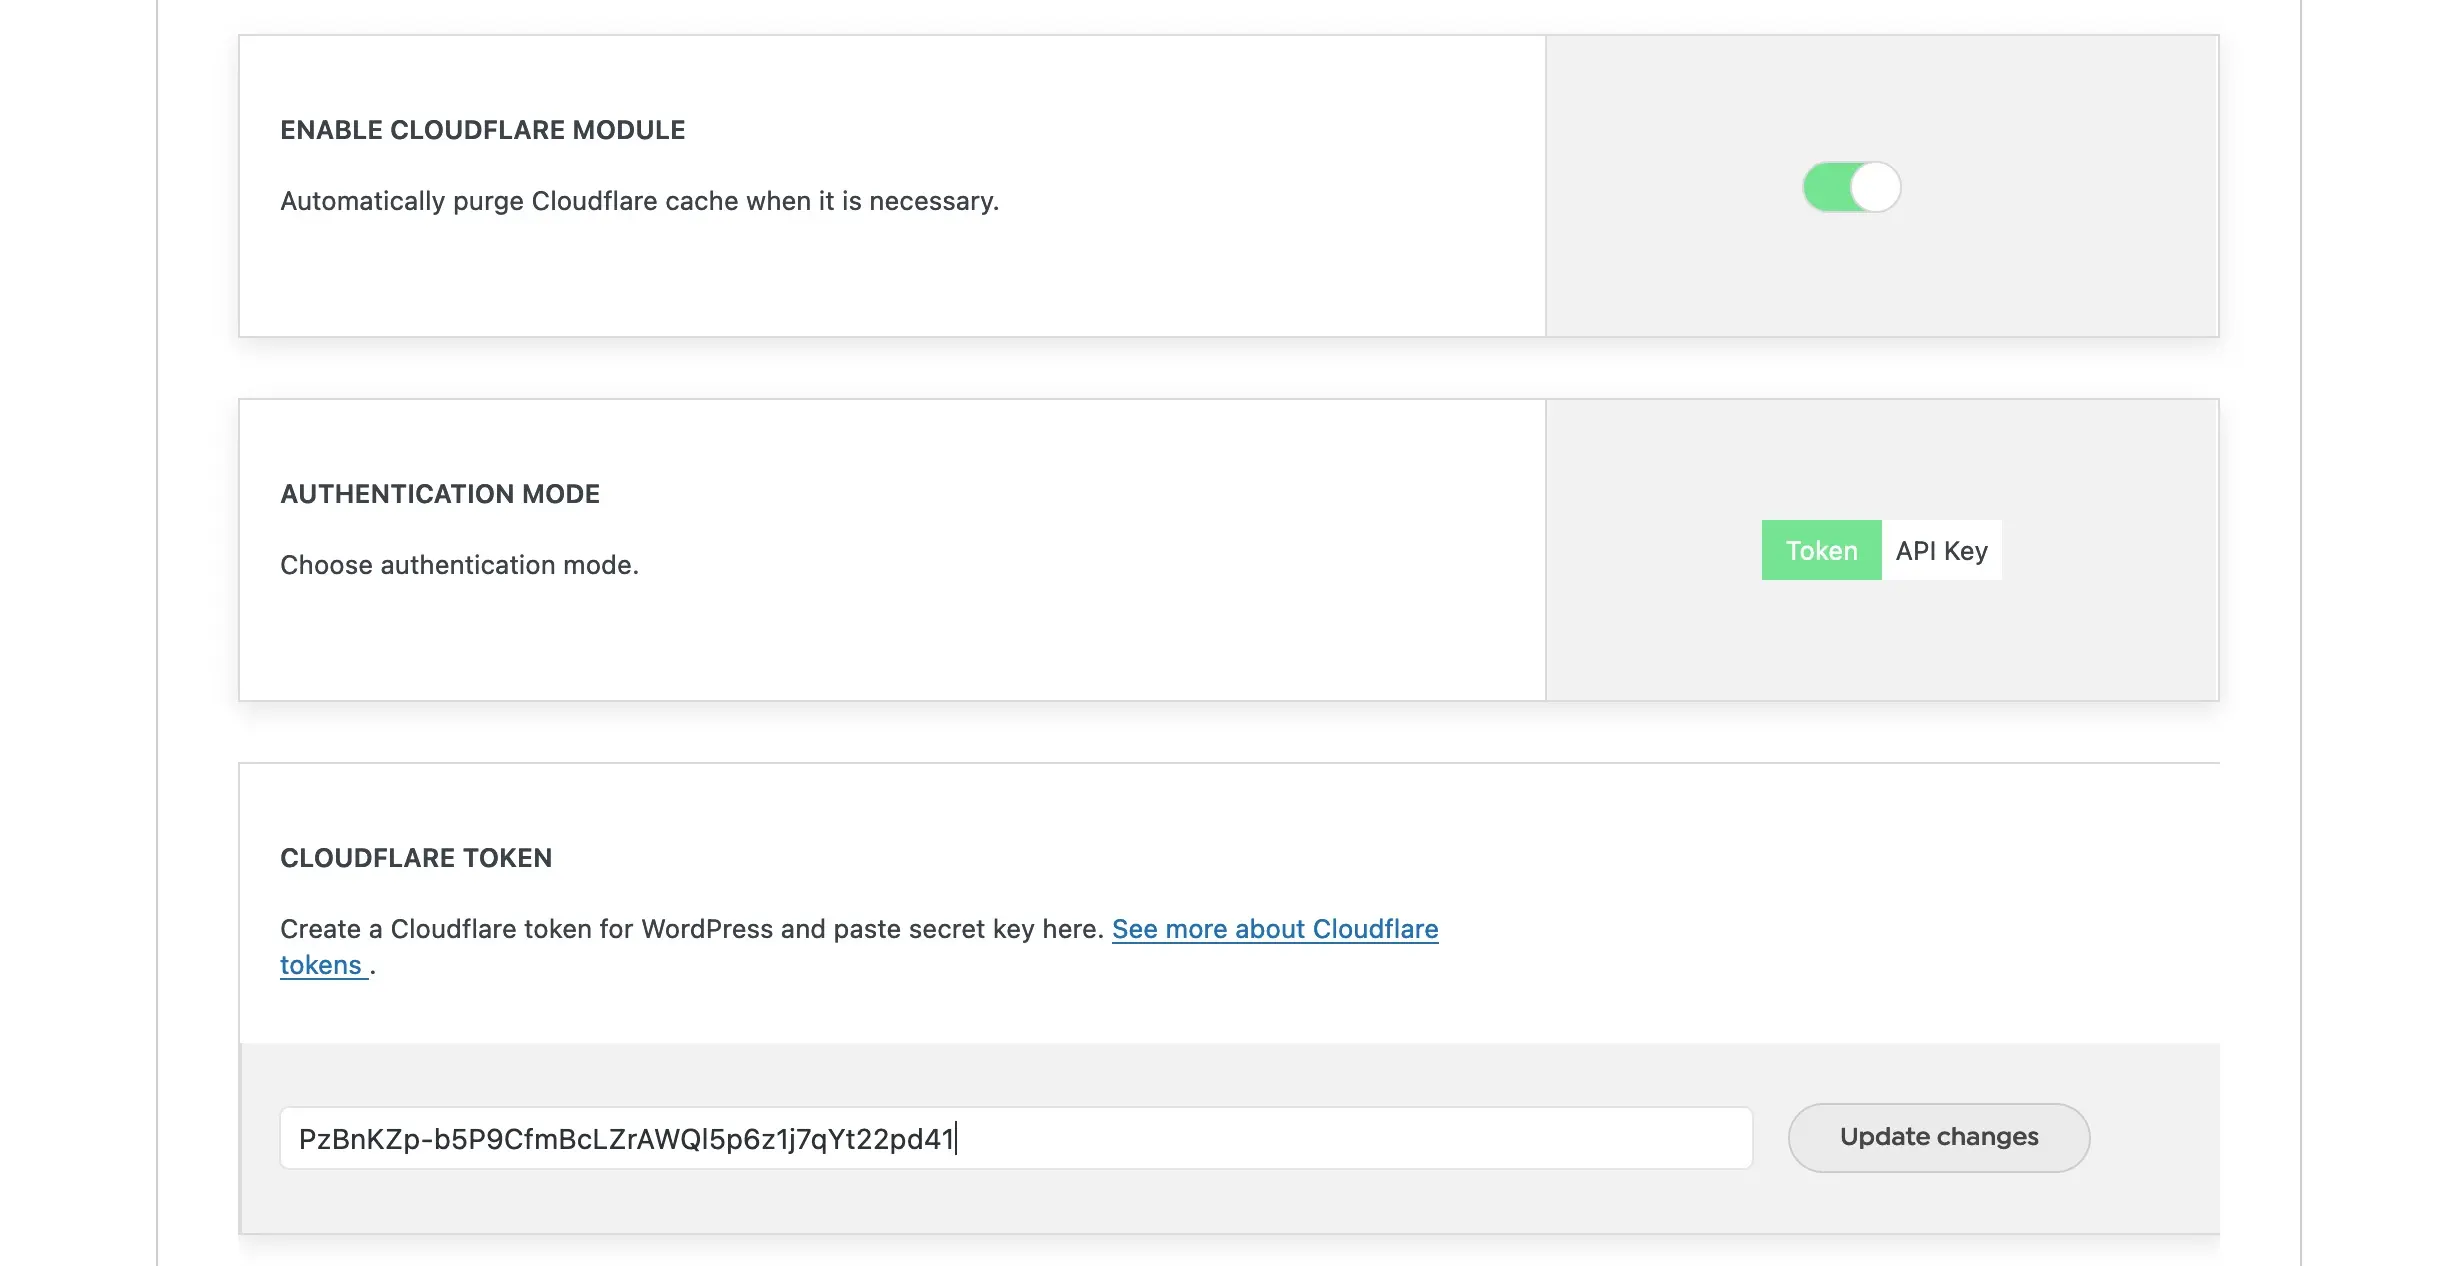
Swift Performance verifies the token against Cloudflare’s API and detects your zone on its own — there is no zone ID to look up and no domain to type in. If something is off (wrong token, domain not on this Cloudflare account), you get a log entry telling you which, rather than a silently broken cache.
Step 3 — Turn on full-page caching
Now the actual feature: enable Cloudflare Proxy Cache on the same tab. With the token in place, Swift Performance configures Cloudflare for you over the API — it creates a rule that caches everything on your domain, and a second rule that bypasses the cache for wp-admin. That pair is the entire trick APO performs, minus the add-on: your HTML is now stored on Cloudflare’s edge, and repeat visitors get pages served from the data center nearest to them without your server being involved at all.
Excluded pages take care of themselves. Anything Swift Performance does not cache — cart, checkout, account pages, anything you exclude by hand — is sent with no-cache headers, and Cloudflare’s cache-everything rule respects those, so dynamic pages never get frozen at the edge. And because auto-purge is connected, the edge copy of a page dies the moment you change it, which is exactly why a very long proxy cache lifetime is safe here: expiry is not your invalidation strategy anymore, purging is.
Prefer to see the machinery, or want to set the rules up by hand instead? Our step-by-step token guide with the rule details is in the Swift Performance documentation, and Cloudflare documents its modern Cache Rules if you want to build the equivalent manually — just remember that manual rules solve the caching half and leave you the purging half.
Step 4 — Verify it is actually working
Do not trust a green toggle; check a header. Open a page from your site in a private window, then reload it, and look at the response headers in your browser’s dev tools (Network tab, click the document request):
cf-cache-status: HIT— the page came from Cloudflare’s edge. This is the goal. The first view after a purge will sayMISS(orEXPIRED); the reload should sayHIT.cf-cache-status: DYNAMIC— Cloudflare is not caching the HTML; the rule is not in effect. Check that the proxy cache toggle is on and the token verified.cf-cache-status: BYPASSon cart or checkout — correct and deliberate; that is the exclusion working.
Then run the edit test: change a word in a published post, reload the post from the private window, and confirm you see the change immediately with the status cycling back through MISS to HIT. If you do, purging works, and the setup is complete. To see what this does to your real-world numbers rather than a lab score, this is exactly the case where field data beats PageSpeed — TTFB improves most for the visitors farthest from your server, which a lab test from one location will underreport.
The free-plan caveats, stated honestly
- Logged-in users are the real limitation. Bypassing the edge cache based on cookies is a Cloudflare Business/Enterprise feature. On the free plan, a logged-in user browsing your public pages can be served the same cached HTML as everyone else — the admin bar missing is the usual symptom. For a blog or brochure site where only you log in, this is a non-issue you will notice twice a year. For a membership site where thousands of users browse logged in, it is a real constraint, and the honest advice is that this setup is not for that site.
- WooCommerce works, with the standard care. Cart, checkout and account pages are excluded automatically. If your theme renders cart counts or “welcome back” fragments into otherwise static pages server-side, those need AJAX-based rendering (most modern themes already do this) — that caveat applies to every full-page cache, not just this one.
- Mind your rule budget. The free plan gives you a limited number of rules; the integration needs two. Swift Performance checks the quota before creating them and logs an error instead of failing silently if there is no room — if you have old rules lying around, this is a fine moment to delete them.
- Not every millisecond survives. Edge-cached HTML mainly transforms TTFB and time-to-first-paint for distant visitors. Your largest image still weighs what it weighs — pair this with the rest of your optimization rather than instead of it.
The takeaway
Full-page caching on Cloudflare’s free plan is not a hack; it is the documented behavior of a cache-everything rule, made safe by two things the rule alone does not give you — reliable exclusions and automatic purging. The API token is what turns those from a manual chore into plumbing: create it once with the WordPress template plus the rules permission, paste it into Swift Performance, enable the proxy cache, and check for cf-cache-status: HIT. Ten minutes, no add-on subscription, and your TTFB stops depending on how far the visitor lives from your server.